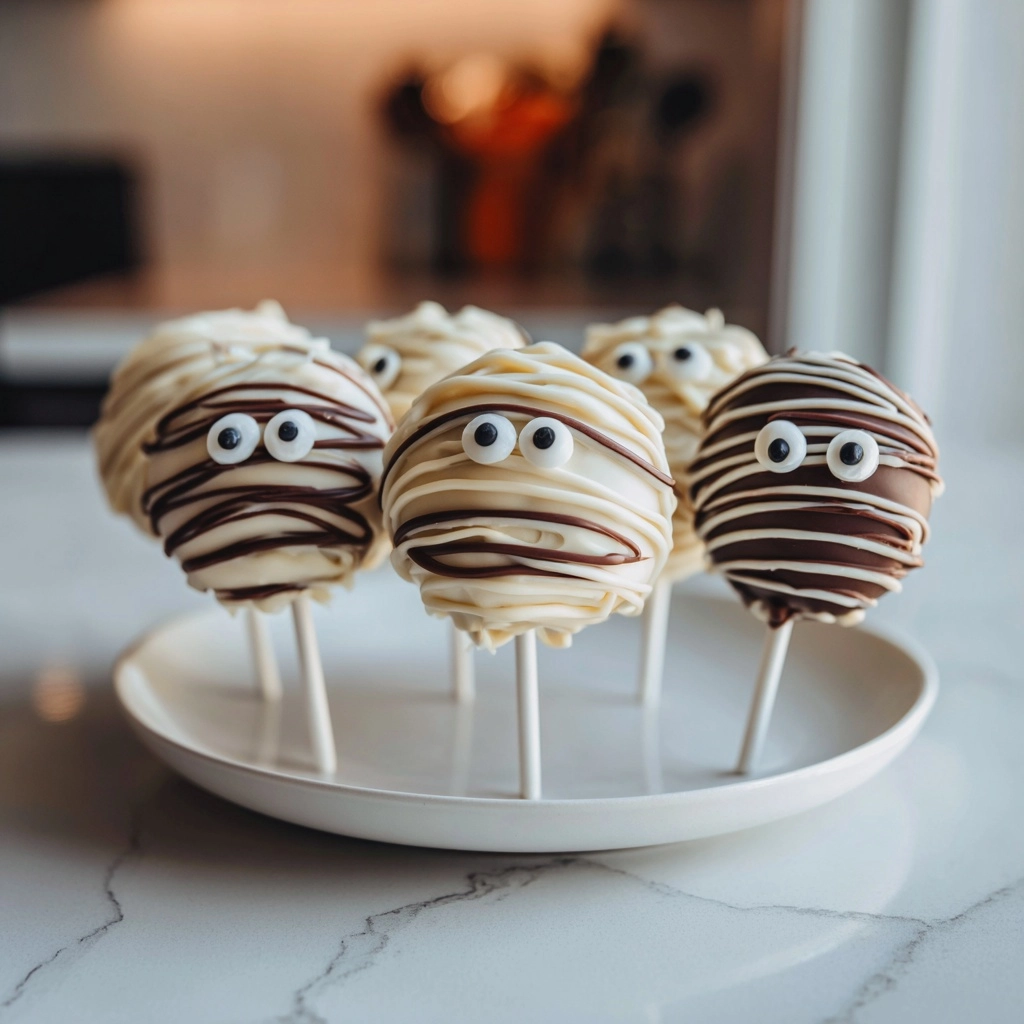
Mummy Oreo Pops
As the leaves turn and the air gets crisp, I can’t help but get excited about Halloween! One of my favorite treats to whip up during this spooky season is Mummy Oreo Pops. These delightful little snacks are not only a quick solution for busy days, but they also bring a smile to everyone’s face. With just a few ingredients, you can create a fun and festive dessert that’s perfect for parties or family gatherings. Trust me, your loved ones will be impressed, and you’ll enjoy the process of making these adorable treats!
Why You’ll Love This Mummy Oreo Pops
These Mummy Oreo Pops are a game-changer for busy moms like me! They’re incredibly easy to make, taking just 30 minutes from start to finish. Plus, the kids can help, making it a fun family activity. The combination of creamy Oreos and sweet white chocolate is simply irresistible. You’ll love how these spooky treats bring joy to your Halloween celebrations without the stress of complicated recipes!
Ingredients for Mummy Oreo Pops
Gathering the right ingredients is the first step to creating these delightful Mummy Oreo Pops. Here’s what you’ll need:
- Oreo cookies: The star of the show! These classic cookies provide a rich, chocolatey base that pairs perfectly with the white chocolate.
- White chocolate melts: These are essential for coating the Oreos. They melt smoothly and create that spooky mummy look. You can also use white chocolate chips if that’s what you have on hand.
- Lollipop sticks: These add a fun twist and make the pops easy to hold. If you don’t have lollipop sticks, you can use pretzel sticks for a crunchy alternative.
- Mini chocolate chips: These little gems serve as the eyes of our mummies. You can also use candy eyes if you want to make them extra spooky!
For exact quantities, check the bottom of the article where you can find everything listed for easy printing. Feel free to get creative with your ingredients! You can even add sprinkles or colored chocolate for a festive touch. The possibilities are endless!
How to Make Mummy Oreo Pops
Now that we have our ingredients ready, let’s dive into the fun part—making these adorable Mummy Oreo Pops! Follow these simple steps, and you’ll have a spooky treat that’s sure to impress.
Step 1: Melt the White Chocolate
Start by melting the white chocolate melts in a microwave-safe bowl. Heat them in 30-second intervals, stirring in between. This helps prevent burning. Once the chocolate is smooth and creamy, it’s ready for dipping. If you find it too thick, add a teaspoon of vegetable oil to thin it out. This will make dipping easier!
Step 2: Dip the Oreos
Next, take each Oreo cookie and dip it halfway into the melted white chocolate. Make sure to coat it evenly for that perfect mummy look. Gently shake off any excess chocolate. If you want a thicker coating, dip it again! Place the dipped Oreos on a baking sheet lined with parchment paper. This will keep them from sticking.
Step 3: Insert Lollipop Sticks
While the chocolate is still wet, insert a lollipop stick into the cream filling of each Oreo. Push it in gently, but not too far, so it doesn’t poke through the other side. This will give your pops stability and make them easy to hold. If you’re using pretzel sticks, insert them carefully to avoid breaking the cookie.
Step 4: Cool the Pops
Now, it’s time to let the pops cool! Place the baking sheet in the refrigerator for about 10-15 minutes. This will help the chocolate harden quickly. Cooling is crucial because it ensures that your Mummy Oreo Pops hold their shape when you add the finishing touches.
Step 5: Create Mummy Bandages
🚫 Don’t Buy This If…
- ❌ You hate hosting fun parties
- ❌ You don’t like saving time in the kitchen
- ❌ You only want boring, basic recipes
✅ What You’ll Get:
- ✅ 63 spooky & delicious Halloween recipes
- ✅ Creepy treats, eerie snacks, scary drinks & more
- ✅ Kid-friendly & adult-approved
- ✅ 📥 Instant digital download – start cooking today!

Once the chocolate is set, it’s time to get creative! Melt a little more white chocolate and drizzle it over each Oreo to create the mummy bandages. Use a fork or a piping bag for more control. Don’t worry about making it perfect; the messier, the better! It adds to the spooky charm.
Step 6: Add Eyes
Finally, place two mini chocolate chips on each Oreo to create the eyes. Press them gently into the chocolate before it hardens. If you’re feeling adventurous, you can use candy eyes for an extra spooky effect. Your Mummy Oreo Pops are now complete and ready to scare up some fun!
Tips for Success
- Make sure your chocolate is fully melted for smooth dipping.
- Use a fork to help dip the Oreos for even coverage.
- Don’t rush the cooling process; it’s key for a sturdy pop.
- Experiment with different toppings like sprinkles or colored chocolate.
- Store any leftovers in an airtight container to keep them fresh.
Equipment Needed
- Microwave-safe bowl: For melting chocolate. A glass bowl works great!
- Baking sheet: To cool the pops. You can use a plate if you don’t have one.
- Parchment paper: To prevent sticking. Wax paper is a good substitute.
- Fork or piping bag: For drizzling chocolate. A plastic sandwich bag with a corner cut off works too!
Variations of Mummy Oreo Pops
- Chocolate Oreo Pops: Swap out regular Oreos for chocolate-flavored ones for an extra chocolatey treat!
- Gluten-Free Option: Use gluten-free Oreo cookies to make these pops suitable for those with dietary restrictions.
- Dark Chocolate Coating: For a richer flavor, try using dark chocolate melts instead of white chocolate.
- Nutty Twist: Add crushed nuts or toffee bits to the melted chocolate for a crunchy texture.
- Colorful Mummies: Use colored candy melts to create vibrant mummies that are sure to catch the eye!
Serving Suggestions for Mummy Oreo Pops
- Spooky Platter: Arrange the Mummy Oreo Pops on a festive Halloween platter for a fun presentation.
- Pair with Milk: Serve with a glass of cold milk for a classic treat combination.
- Halloween-Themed Drinks: Offer themed drinks like pumpkin spice lattes or spooky punch.
- Decorative Sticks: Use colorful or themed lollipop sticks to enhance the festive look.
- Party Favors: Wrap them in clear bags tied with orange ribbons for cute party favors!
FAQs about Mummy Oreo Pops
As you embark on your Mummy Oreo Pops adventure, you might have a few questions. Here are some common queries I’ve encountered, along with helpful answers to guide you through the process!
Can I use regular chocolate instead of white chocolate?
Absolutely! While the classic look is achieved with white chocolate, using milk or dark chocolate can add a delicious twist. Just remember, it won’t have that spooky mummy appearance!
How long do Mummy Oreo Pops last?
These treats can last up to a week when stored in an airtight container at room temperature. However, they’re so tasty, they might not last that long!
Can I make these pops ahead of time?
Yes! Mummy Oreo Pops can be made a day in advance. Just keep them in an airtight container to maintain freshness. They’re perfect for prepping ahead of a Halloween party!
What if I don’t have lollipop sticks?
No worries! You can use pretzel sticks or even sturdy straws as a fun alternative. Just make sure whatever you use is stable enough to hold the pops.
Can I customize the eyes on my Mummy Oreo Pops?
Definitely! While mini chocolate chips are adorable, you can use candy eyes or even small candies for a unique touch. Get creative and have fun with it!
Summarizing the Joy of Mummy Oreo Pops
Making Mummy Oreo Pops is more than just a fun Halloween activity; it’s a delightful way to create lasting memories with your family. The joy of dipping, decorating, and sharing these spooky treats brings everyone together, sparking laughter and creativity. Each bite is a sweet reminder of the festive spirit of the season. Plus, the smiles on your loved ones’ faces as they enjoy these treats are priceless. So, roll up your sleeves, gather your ingredients, and let the magic of Mummy Oreo Pops fill your home with warmth and joy this Halloween!
Print
Mummy Oreo Pops: A Fun Halloween Treat to Try!
- Prep Time: 20 minutes
- Cook Time: 10 minutes
- Total Time: 30 minutes
- Yield: 12 pops 1x
- Category: Dessert
- Method: No-Bake
- Cuisine: American
- Diet: Vegetarian
Description
Mummy Oreo Pops are a fun and festive Halloween treat that combines the classic taste of Oreos with a spooky twist, perfect for parties and celebrations.
Ingredients
- 1 package of Oreo cookies
- 1 package of white chocolate melts
- 1 package of lollipop sticks
- Mini chocolate chips for eyes
Instructions
- Start by melting the white chocolate melts in a microwave-safe bowl according to package instructions.
- Dip each Oreo cookie halfway into the melted white chocolate, ensuring it is well coated.
- Insert a lollipop stick into the cream filling of each Oreo.
- Place the dipped Oreos on a baking sheet lined with parchment paper and let them cool until the chocolate hardens.
- Once the chocolate is set, use a drizzle of melted white chocolate to create mummy bandages on each Oreo.
- Finally, place two mini chocolate chips on each Oreo to create eyes.
Notes
- Make sure to let the chocolate cool completely before serving.
- These can be made a day in advance and stored in an airtight container.
- Feel free to get creative with decorations!
Nutrition
- Serving Size: 1 pop
- Calories: 150
- Sugar: 10g
- Sodium: 50mg
- Fat: 7g
- Saturated Fat: 4g
- Unsaturated Fat: 2g
- Trans Fat: 0g
- Carbohydrates: 20g
- Fiber: 1g
- Protein: 1g
- Cholesterol: 5mg

