

Witch Hat Cupcakes
As the leaves turn and the air gets crisp, I can’t help but get excited about Halloween. One of my favorite treats to whip up are these delightful Witch Hat Cupcakes. They’re not just a feast for the eyes; they’re a quick solution for busy days filled with school events and family gatherings. With a simple chocolate cake base and whimsical chocolate cones, these cupcakes are sure to impress your loved ones. Plus, they’re a fun way to get the kids involved in the kitchen. Let’s dive into this spooky yet scrumptious recipe!
Why You’ll Love This Witch Hat Cupcakes
These Witch Hat Cupcakes are a delightful blend of ease and taste, making them perfect for busy moms like us. With just a few simple ingredients, you can whip up a batch in no time. The rich chocolate flavor paired with the whimsical presentation will have everyone raving. Plus, they’re a fantastic way to bring a little magic to your Halloween celebrations without spending hours in the kitchen!
Ingredients for Witch Hat Cupcakes
To create these enchanting Witch Hat Cupcakes, you’ll need a handful of ingredients that are easy to find. Here’s what you’ll gather:
- Chocolate cake mix: This is the base of our cupcakes, providing a rich, chocolatey flavor that pairs perfectly with the witch hats.
- Large eggs: Eggs help bind the ingredients together, giving the cupcakes a fluffy texture.
- Water: This adds moisture to the batter, ensuring your cupcakes are soft and delicious.
- Vegetable oil: A little oil keeps the cupcakes moist and tender, making them irresistible.
- Chocolate frosting: This creamy topping not only enhances the chocolate flavor but also acts as the glue for our witch hats.
- Chocolate ice cream cones: These are the stars of the show, transforming our cupcakes into whimsical witch hats.
- Green candy melts: Melted and drizzled over the cones, these add a pop of color and a touch of magic.
- Edible glitter (optional): For those who want to sprinkle a little extra enchantment, edible glitter adds a festive sparkle.
For exact measurements, check the bottom of the article where you can find everything available for printing. Feel free to get creative with your ingredients! You can use a homemade chocolate cake recipe for a richer flavor or swap out the candy melts for different colors to match your Halloween theme.
How to Make Witch Hat Cupcakes
Step 1: Preheat and Prepare
First things first, let’s get that oven preheating to 350°F (175°C). While it warms up, grab your cupcake pan and line it with festive cupcake liners. I love using colorful ones that scream Halloween! This little step not only makes cleanup easier but also adds a fun touch to your treats. Once the oven is ready, you’ll be all set to bake these delightful Witch Hat Cupcakes. Trust me, the aroma of chocolate will fill your kitchen and get everyone excited!
Step 2: Mix the Batter
Now, let’s whip up that delicious batter! In a large mixing bowl, combine the chocolate cake mix, three large eggs, one cup of water, and half a cup of vegetable oil. I like to use a whisk for this part; it really helps blend everything smoothly. Mix until the batter is nice and velvety, with no lumps in sight. This is where the magic begins! The rich chocolate flavor will have your taste buds dancing in anticipation. Once mixed, it’s time to pour!
Step 3: Bake the Cupcakes
Pour the batter into your lined cupcake pan, filling each liner about two-thirds full. This allows room for the cupcakes to rise beautifully. Pop the pan into your preheated oven and set a timer for 18-20 minutes. To check for doneness, insert a toothpick into the center of a cupcake. If it comes out clean, they’re ready! If not, give them a few more minutes. The smell of chocolate wafting through your home will be absolutely irresistible!
Step 4: Cool and Frost
Once baked, remove the cupcakes from the oven and let them cool in the pan for about five minutes. Then, transfer them to a wire rack to cool completely. This step is crucial; you don’t want to frost warm cupcakes! Once they’re cool, grab that can of chocolate frosting and generously frost each cupcake. I like to use a spatula for a smooth finish, but feel free to get creative with your frosting technique. The more chocolate, the better, right?
Step 5: Create the Witch Hats
Now for the fun part! Take a chocolate ice cream cone and gently invert it on top of each frosted cupcake. This is where the witch hat magic happens! Make sure the cone is centered and pressed down slightly into the frosting. It should look like a whimsical hat perched atop a delicious cupcake. Your kids will love helping with this step, and it’s a great way to get them involved in the kitchen. Just wait until they see the final result!
Step 6: Add the Magical Touch
🚫 Don’t Buy This If…
- ❌ You hate hosting fun parties
- ❌ You don’t like saving time in the kitchen
- ❌ You only want boring, basic recipes
✅ What You’ll Get:
- ✅ 63 spooky & delicious Halloween recipes
- ✅ Creepy treats, eerie snacks, scary drinks & more
- ✅ Kid-friendly & adult-approved
- ✅ 📥 Instant digital download – start cooking today!

To make these cupcakes truly enchanting, let’s add a splash of color! Melt the green candy melts according to the package instructions. Once melted, drizzle the vibrant green over the chocolate cones. This adds a pop of color and a magical touch to your witch hats. If you’re feeling extra festive, sprinkle some edible glitter on top for that sparkling effect. Your Witch Hat Cupcakes are now ready to cast a spell on everyone at your Halloween gathering!
Tips for Success
- Make sure your eggs are at room temperature for better mixing.
- Don’t overmix the batter; a few lumps are okay!
- Use a toothpick to check for doneness; it should come out clean.
- Let cupcakes cool completely before frosting to avoid melting.
- Get creative with decorations; different colors of candy melts can add flair!
Equipment Needed
- Cupcake pan: A standard 12-cup pan works perfectly; silicone pans are a fun alternative.
- Cupcake liners: Use festive paper liners or reusable silicone ones for an eco-friendly option.
- Mixing bowl: A large bowl is essential; a stand mixer can save time if you have one.
- Whisk or spatula: Both are great for mixing and frosting; a piping bag can add flair!
Variations of Witch Hat Cupcakes
- Gluten-Free Option: Substitute the chocolate cake mix with a gluten-free blend to accommodate dietary needs.
- Vegan Twist: Use a vegan chocolate cake mix and replace eggs with flaxseed meal mixed with water for a plant-based version.
- Flavor Infusion: Add a teaspoon of peppermint extract to the batter for a refreshing twist that pairs well with chocolate.
- Colorful Cones: Use colored sugar cones or even waffle cones dipped in chocolate for a fun variation on the witch hats.
- Nutty Delight: Fold in chopped nuts or chocolate chips into the batter for added texture and flavor.
Serving Suggestions for Witch Hat Cupcakes
- Pair with a spooky punch or hot apple cider for a festive drink option.
- Serve on a decorative platter with Halloween-themed decorations for a fun presentation.
- Include a side of gummy worms or candy corn for an extra treat.
- Consider adding themed napkins and plates to enhance the Halloween vibe.
FAQs about Witch Hat Cupcakes
Can I make Witch Hat Cupcakes ahead of time?
Absolutely! You can bake the cupcakes a day in advance and store them in an airtight container. Just wait to frost and assemble the witch hats until the day of your event to keep everything fresh and delicious.
What can I use instead of chocolate frosting?
If chocolate isn’t your thing, feel free to use vanilla frosting or even cream cheese frosting. Both options will still complement the chocolate cake beautifully while adding a different flavor profile.
How do I store leftover Witch Hat Cupcakes?
Store any leftover cupcakes in an airtight container at room temperature for up to three days. If you want to keep them longer, consider refrigerating them, but let them come to room temperature before serving for the best taste.
Can I customize the decorations on the cupcakes?
Definitely! Get creative with your decorations. You can use different colors of candy melts, sprinkles, or even edible eyes to give your witch hats a unique twist. The sky’s the limit!
Are Witch Hat Cupcakes suitable for kids?
Yes! These cupcakes are perfect for kids. They can help with the assembly and decorating, making it a fun family activity. Just keep an eye on the edible glitter; it can be a bit messy!
Summarizing the Joy of Witch Hat Cupcakes
Creating Witch Hat Cupcakes is more than just baking; it’s about making memories with your loved ones. The laughter shared in the kitchen, the excitement of decorating, and the joy of seeing everyone’s faces light up when they see these whimsical treats are priceless. These cupcakes bring a sprinkle of magic to your Halloween celebrations, making them a delightful addition to any gathering. Plus, they’re a fantastic way to involve the kids in the kitchen, fostering creativity and fun. So, roll up your sleeves and let the Halloween spirit shine through your baking!
Print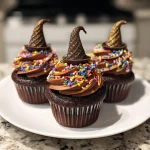
Witch Hat Cupcakes: Delightful Treat for Halloween Fun!
- Prep Time: 20 minutes
- Cook Time: 20 minutes
- Total Time: 40 minutes
- Yield: 12 cupcakes 1x
- Category: Dessert
- Method: Baking
- Cuisine: American
- Diet: Vegetarian
Description
Witch Hat Cupcakes are a fun and festive treat perfect for Halloween celebrations. These delightful cupcakes are topped with chocolate cones to resemble witch hats, making them a hit at any Halloween party.
Ingredients
- 1 box chocolate cake mix
- 3 large eggs
- 1 cup water
- 1/2 cup vegetable oil
- 1 can chocolate frosting
- 12 chocolate ice cream cones
- 1 cup green candy melts
- 1/2 cup edible glitter (optional)
Instructions
- Preheat the oven to 350°F (175°C) and line a cupcake pan with cupcake liners.
- In a large bowl, combine the chocolate cake mix, eggs, water, and vegetable oil. Mix until smooth.
- Pour the batter into the cupcake liners, filling each about 2/3 full.
- Bake for 18-20 minutes or until a toothpick inserted in the center comes out clean.
- Allow the cupcakes to cool completely.
- Frost each cupcake with chocolate frosting.
- Invert a chocolate ice cream cone on top of each frosted cupcake to create the witch hat.
- Melt the green candy melts according to package instructions and drizzle over the cones.
- Sprinkle edible glitter on top for a magical touch, if desired.
Notes
- For a more intense chocolate flavor, use a homemade chocolate cake recipe.
- Feel free to customize the decorations with different colors of candy melts.
- Store cupcakes in an airtight container at room temperature for up to 3 days.
Nutrition
- Serving Size: 1 cupcake
- Calories: 250
- Sugar: 20g
- Sodium: 150mg
- Fat: 12g
- Saturated Fat: 3g
- Unsaturated Fat: 8g
- Trans Fat: 0g
- Carbohydrates: 35g
- Fiber: 2g
- Protein: 3g
- Cholesterol: 30mg