

Halloween Brownies
As the leaves turn and the air gets crisp, I can’t help but get excited about Halloween. It’s that magical time of year when spooky decorations fill our homes and sweet treats become a must. These Halloween brownies are not just delicious; they’re a quick solution for busy days filled with school events and family gatherings. With just a few simple ingredients, you can whip up a batch that will impress your loved ones and delight the little ghouls in your life. Trust me, these brownies will be the highlight of your Halloween festivities!
Why You’ll Love This Halloween Brownies
These Halloween brownies are a dream come true for busy moms and professionals alike. They come together in just 45 minutes, making them perfect for last-minute treats. The rich, fudgy texture is simply irresistible, and the festive sprinkles add a fun touch that kids adore. Plus, they’re easy to customize, so you can make them as spooky or sweet as you like. Who wouldn’t love a treat that’s both quick and delicious?
Ingredients for Halloween Brownies
Gathering the right ingredients is the first step to creating these delightful Halloween brownies. Here’s what you’ll need:
- Unsalted butter: This adds richness and moisture to the brownies. You can substitute with coconut oil for a dairy-free option.
- Granulated sugar: Sweetness is key! Brown sugar can be used for a deeper flavor.
- Large eggs: They help bind the ingredients together and create that fudgy texture. If you need an egg substitute, try applesauce or flaxseed meal.
- Vanilla extract: A splash of vanilla enhances the overall flavor. Pure vanilla is best, but imitation works too.
- All-purpose flour: This provides structure to the brownies. For a gluten-free version, use almond flour or a gluten-free blend.
- Cocoa powder: The star of the show! It gives the brownies their rich chocolate flavor. Dutch-processed cocoa can add a smoother taste.
- Salt: Just a pinch balances the sweetness and enhances the chocolate flavor.
- Baking powder: This leavening agent helps the brownies rise slightly, giving them a nice texture.
- Chocolate chips: These add extra chocolatey goodness. You can use dark, milk, or even white chocolate chips for a fun twist.
- Halloween-themed sprinkles: These are optional but add a festive touch that makes the brownies perfect for the season!
For exact measurements, check the bottom of the article where you can find everything listed for easy printing. Happy baking!
How to Make Halloween Brownies
Step 1: Preheat and Prepare
First things first, let’s get that oven preheating to 350°F (175°C). This step is crucial for achieving that perfect fudgy texture. While the oven warms up, grab a 9×13 inch baking pan and grease it well. You can use butter or cooking spray for this. Greasing the pan ensures that your brownies won’t stick, making it easier to cut them into those delightful squares later. Trust me, no one wants to wrestle with stuck brownies!
Step 2: Mix the Wet Ingredients
Now, let’s melt that unsalted butter. You can do this in a microwave-safe bowl or on the stovetop. Once melted, mix in the granulated sugar until it’s well combined. Next, crack in the eggs, one at a time, stirring well after each addition. This helps create a smooth batter. Finally, add a splash of vanilla extract for that warm, inviting flavor. The aroma will make your kitchen feel like a cozy bakery!
Step 3: Combine the Dry Ingredients
In a separate bowl, whisk together the all-purpose flour, cocoa powder, salt, and baking powder. This step is essential for evenly distributing the dry ingredients. Make sure there are no lumps in the cocoa powder; we want a smooth brownie batter! The cocoa powder is what gives these Halloween brownies their rich chocolate flavor, so don’t skimp on this step. It’s like a secret potion for deliciousness!
Step 4: Combine Wet and Dry Mixtures
Now it’s time to bring the wet and dry ingredients together. Gradually add the dry mixture to the wet ingredients, stirring gently until just combined. Be careful not to overmix; we want our brownies to be fudgy, not tough! The batter should be thick and luscious, almost like a chocolate cloud. This is where the magic happens, and you can already imagine how delicious these Halloween brownies will be!
Step 5: Add Chocolate Chips
Let’s take it up a notch by folding in those chocolate chips. Use a spatula to gently mix them into the batter. This step adds extra chocolatey goodness, making every bite a delightful surprise. You can use dark, milk, or even white chocolate chips for a fun twist. Just imagine biting into a brownie and finding those gooey pockets of melted chocolate. Yum!
Step 6: Bake the Brownies
🚫 Don’t Buy This If…
- ❌ You hate hosting fun parties
- ❌ You don’t like saving time in the kitchen
- ❌ You only want boring, basic recipes
✅ What You’ll Get:
- ✅ 63 spooky & delicious Halloween recipes
- ✅ Creepy treats, eerie snacks, scary drinks & more
- ✅ Kid-friendly & adult-approved
- ✅ 📥 Instant digital download – start cooking today!

Pour the brownie batter into your prepared baking pan, spreading it evenly. This ensures that they bake uniformly. Pop the pan into the preheated oven and let them bake for 25-30 minutes. Keep an eye on them! You’ll know they’re done when a toothpick inserted in the center comes out clean or with a few moist crumbs. The smell wafting through your kitchen will be absolutely heavenly!
Step 7: Cool and Decorate
Once baked, remove the brownies from the oven and let them cool in the pan for about 10-15 minutes. This cooling time is essential for cutting them into perfect squares. After they’ve cooled, transfer them to a wire rack to cool completely. Finally, it’s time for the fun part! Top your brownies with Halloween-themed sprinkles. This adds a festive touch that makes them perfect for your spooky celebrations!
Tips for Success
- Always measure your ingredients accurately for the best results.
- Let the brownies cool completely before cutting to avoid crumbling.
- Use high-quality cocoa powder for a richer chocolate flavor.
- Experiment with different types of chocolate chips for unique flavors.
- Don’t overmix the batter; it should be thick and fudgy.
Equipment Needed
- 9×13 inch baking pan: A standard size for brownies; you can use a glass or metal pan.
- Mixing bowls: Use any size you have on hand; a large bowl is ideal for mixing.
- Whisk: A whisk helps combine dry ingredients; a fork works in a pinch.
- Spatula: Perfect for folding in chocolate chips; a wooden spoon can also do the job.
- Measuring cups and spoons: Essential for accuracy; you can use a kitchen scale if preferred.
Variations of Halloween Brownies
- Nutty Delight: Add chopped walnuts or pecans for a crunchy texture that complements the fudgy brownies.
- Minty Twist: Incorporate mint chocolate chips or a few drops of peppermint extract for a refreshing flavor.
- Spooky Swirls: Swirl in some cream cheese or pumpkin puree for a festive touch and a creamy texture.
- Gluten-Free Option: Substitute all-purpose flour with a gluten-free flour blend for a deliciously inclusive treat.
- Vegan Version: Replace eggs with flaxseed meal and use plant-based butter for a vegan-friendly brownie.
Serving Suggestions for Halloween Brownies
- Pair with a scoop of vanilla ice cream for a delightful contrast to the rich brownies.
- Serve alongside a warm cup of hot chocolate topped with whipped cream for a cozy treat.
- Present on a spooky-themed platter, garnished with candy corn or mini pumpkins for a festive touch.
- Drizzle with caramel or chocolate sauce for an extra indulgent experience.
- Offer with a side of fresh fruit, like strawberries or raspberries, to balance the sweetness.
FAQs about Halloween Brownies
Can I make these Halloween brownies ahead of time?
Absolutely! You can bake the brownies a day or two in advance. Just store them in an airtight container at room temperature. They’ll stay fresh and delicious, ready for your Halloween festivities!
How do I store leftover Halloween brownies?
To keep your brownies fresh, store them in an airtight container. They’ll last for up to three days at room temperature. If you want to keep them longer, you can freeze them for up to three months. Just make sure to wrap them tightly!
Can I use different types of chocolate chips?
Definitely! Feel free to mix it up with dark, milk, or even white chocolate chips. Each type brings its own unique flavor, making your Halloween brownies even more delightful!
What can I use instead of eggs in this recipe?
If you need an egg substitute, try using applesauce or flaxseed meal mixed with water. Both options work well to bind the ingredients and keep your brownies moist.
Can I add other mix-ins to the brownies?
Of course! You can add nuts, dried fruit, or even candy pieces for a fun twist. Just remember to adjust the baking time slightly if you add a lot of extra ingredients!
Summarizing the Joy of Halloween Brownies
There’s something truly magical about baking Halloween brownies. The aroma fills your home, creating a warm and inviting atmosphere that brings everyone together. Watching your loved ones’ faces light up as they take that first bite is priceless. These brownies are more than just a treat; they’re a way to create memories and celebrate the season. Whether you’re hosting a spooky gathering or simply enjoying a cozy night in, these brownies add a touch of joy to any occasion. So, roll up your sleeves, embrace the fun, and let the Halloween spirit shine through your baking!
Print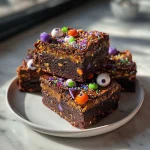
Halloween Brownies: Bake Spooktacular Treats Today!
- Prep Time: 15 minutes
- Cook Time: 30 minutes
- Total Time: 45 minutes
- Yield: 24 brownies 1x
- Category: Dessert
- Method: Baking
- Cuisine: American
- Diet: Vegetarian
Description
Deliciously spooky brownies perfect for Halloween celebrations.
Ingredients
- 1 cup unsalted butter
- 2 cups granulated sugar
- 4 large eggs
- 1 teaspoon vanilla extract
- 1 cup all-purpose flour
- 1 cup cocoa powder
- 1/2 teaspoon salt
- 1/2 teaspoon baking powder
- 1 cup chocolate chips
- Halloween-themed sprinkles
Instructions
- Preheat your oven to 350°F (175°C) and grease a 9×13 inch baking pan.
- In a large bowl, melt the butter and mix in the sugar until well combined.
- Add the eggs one at a time, mixing well after each addition, then stir in the vanilla extract.
- In another bowl, whisk together the flour, cocoa powder, salt, and baking powder.
- Gradually add the dry ingredients to the wet ingredients, mixing until just combined.
- Fold in the chocolate chips.
- Pour the batter into the prepared baking pan and spread evenly.
- Bake for 25-30 minutes or until a toothpick inserted in the center comes out clean.
- Let the brownies cool before cutting them into squares.
- Top with Halloween-themed sprinkles before serving.
Notes
- For extra spookiness, use food coloring to tint the batter or frosting.
- Store leftovers in an airtight container for up to 3 days.
- These brownies can be frozen for up to 3 months.
Nutrition
- Serving Size: 1 brownie
- Calories: 200
- Sugar: 18g
- Sodium: 150mg
- Fat: 10g
- Saturated Fat: 6g
- Unsaturated Fat: 4g
- Trans Fat: 0g
- Carbohydrates: 25g
- Fiber: 2g
- Protein: 3g
- Cholesterol: 50mg