

Halloween Dirt Cups
As the leaves turn and the air gets crisp, I can’t help but get excited about Halloween. It’s that magical time of year when creativity runs wild, and Halloween Dirt Cups become the star of the show! These delightful treats are not only a quick solution for busy days, but they also bring a smile to everyone’s face. With layers of creamy chocolate pudding, crunchy cookies, and gummy worms peeking out, they’re a fun way to celebrate the spooky season. Trust me, whether you’re hosting a party or just looking to impress your family, these cups are sure to be a hit!
Why You’ll Love This Halloween Dirt Cups
These Halloween Dirt Cups are a breeze to whip up, making them perfect for busy moms like us. With just a few simple ingredients, you can create a dessert that’s both delicious and visually fun. Plus, they require no baking, so you can spend more time enjoying the festivities. The combination of rich chocolate pudding and crunchy cookies is simply irresistible, ensuring smiles all around!
Ingredients for Halloween Dirt Cups
Gathering the right ingredients is half the fun! Here’s what you’ll need to create these spooky delights:
- Chocolate pudding mix: This is the star of the show, providing that rich, creamy base that everyone loves.
- Milk: Essential for preparing the pudding mix. You can use whole, skim, or even a non-dairy alternative like almond milk.
- Oreo cookies: These crushed cookies add a delightful crunch and mimic the look of dirt. Feel free to experiment with other chocolate cookies if you prefer!
- Gummy worms: These creepy crawlers are the perfect garnish, adding a playful touch that kids adore. You can also use other gummy candies for variety.
- Plastic cups: Ideal for serving your dirt cups. They’re easy to handle and make for a fun presentation. You can also use small mason jars for a more rustic look.
For those who want to get creative, consider adding Halloween-themed sprinkles or even a layer of whipped cream for extra flair. The exact quantities of each ingredient are listed at the bottom of the article, ready for printing!
How to Make Halloween Dirt Cups
Now that we have our ingredients ready, let’s dive into the fun part—making these Halloween Dirt Cups! Follow these simple steps, and you’ll have a spooky dessert that’s sure to impress.
Step 1: Prepare the Chocolate Pudding
Start by grabbing your chocolate pudding mix and milk. In a mixing bowl, combine them according to the package instructions. Whisk until smooth and creamy. This step is where the magic begins! The rich chocolate flavor will set the stage for our delicious layers. Once it’s ready, set it aside for a moment while you tackle the next step.
Step 2: Crush the Oreo Cookies
Next up, it’s time to unleash your inner cookie monster! Take your Oreo cookies and place them in a zip-top bag. Seal it tightly, then crush them with a rolling pin or your hands until they resemble fine crumbs. This is the “dirt” for our cups, and it adds a delightful crunch. If you want a smoother texture, you can also use a food processor. Just be careful not to turn them into powder!
Step 3: Layer the Ingredients
Now comes the fun part—layering! Grab your plastic cups and start with a generous spoonful of chocolate pudding at the bottom. Then, sprinkle a layer of crushed Oreo cookies on top. Repeat this process until the cups are filled, finishing with a layer of crushed cookies. This creates a beautiful contrast that looks just like dirt! The layers are not only visually appealing but also create a delightful mix of textures.
Step 4: Garnish and Chill
To add the final spooky touch, place a few gummy worms on top of each cup. They’ll look like they’re crawling out of the dirt! Once you’ve garnished your cups, pop them in the refrigerator for at least 30 minutes. This chilling time allows the flavors to meld together and makes the pudding even more delicious. Plus, it gives you a moment to relax before the fun begins!
Tips for Success
- Use cold milk for a creamier pudding texture.
- Crush the cookies just before layering to keep them crunchy.
- For a festive touch, add Halloween-themed sprinkles on top.
- Make these cups a day in advance for easy party prep.
- Experiment with different candies for unique flavors and looks.
Equipment Needed
- Mixing bowl: A medium-sized bowl works best for mixing the pudding.
- Whisk: Essential for blending the pudding mix and milk smoothly.
- Zip-top bag: Perfect for crushing the Oreo cookies without the mess.
- Plastic cups: Great for serving; small mason jars can be a charming alternative.
- Spoon: For layering and serving your delicious dirt cups.
Variations of Halloween Dirt Cups
- Peanut Butter Delight: Mix in some creamy peanut butter with the chocolate pudding for a nutty twist that kids will love.
- Vegan Option: Use a plant-based chocolate pudding mix and almond milk to create a dairy-free version that everyone can enjoy.
- Fruit Layer: Add a layer of mashed bananas or strawberries between the pudding and cookies for a fruity surprise.
- Gluten-Free: Substitute regular Oreo cookies with gluten-free chocolate cookies to make this treat suitable for gluten-sensitive guests.
- Spooky Sprinkles: Top with Halloween-themed sprinkles or edible glitter for an extra festive flair that adds color and fun!
Serving Suggestions for Halloween Dirt Cups
- Pair with spooky-themed drinks: Serve with orange soda or a fun Halloween punch for a festive touch.
- Presentation matters: Arrange the cups on a decorative platter with fake spider webs for a creepy vibe.
- Accompany with fruit: Fresh fruit skewers can add a refreshing contrast to the rich dessert.
- Use themed napkins: Halloween-themed napkins can enhance the overall presentation and excitement.
FAQs about Halloween Dirt Cups
🚫 Don’t Buy This If…
- ❌ You hate hosting fun parties
- ❌ You don’t like saving time in the kitchen
- ❌ You only want boring, basic recipes
✅ What You’ll Get:
- ✅ 63 spooky & delicious Halloween recipes
- ✅ Creepy treats, eerie snacks, scary drinks & more
- ✅ Kid-friendly & adult-approved
- ✅ 📥 Instant digital download – start cooking today!

As we dive into the world of Halloween Dirt Cups, you might have a few questions swirling around in your mind. Don’t worry; I’ve got you covered! Here are some common queries that fellow home cooks often ask:
Can I make Halloween Dirt Cups in advance?
Absolutely! These cups can be made a day ahead. Just store them in the refrigerator until you’re ready to serve. This makes them a perfect treat for busy days!
What can I use instead of gummy worms?
If gummy worms aren’t your thing, feel free to get creative! You can use other gummy candies, chocolate spiders, or even candy corn for a festive touch.
How long do Halloween Dirt Cups last in the fridge?
These delightful cups can last up to three days in the fridge. Just make sure they’re covered to keep them fresh and tasty!
Can I use different flavors of pudding?
Of course! While chocolate is a classic choice, you can experiment with vanilla or even pumpkin spice pudding for a seasonal twist. The possibilities are endless!
Are Halloween Dirt Cups suitable for kids?
Definitely! These cups are a hit with kids and adults alike. They’re fun to make and even more fun to eat, making them a perfect treat for Halloween parties!
Summarizing the Joy of Halloween Dirt Cups
Creating Halloween Dirt Cups is more than just making a dessert; it’s about crafting memories with your loved ones. The joy of layering chocolate pudding and crushed cookies brings out the child in all of us. Watching the kids’ eyes light up as they dig into their spooky treats is priceless. Plus, these cups are a fantastic way to involve the whole family in the kitchen. Whether you’re hosting a Halloween party or enjoying a cozy night in, these delightful cups are sure to add a sprinkle of magic to your celebrations. Happy Halloween baking!
Print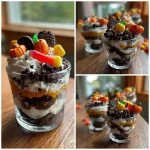
Halloween Dirt Cups: A Spooktacular Treat Recipe!
- Prep Time: 15 minutes
- Cook Time: 0 minutes
- Total Time: 45 minutes (including chilling time)
- Yield: 4 servings 1x
- Category: Dessert
- Method: No-bake
- Cuisine: American
- Diet: Vegetarian
Description
Halloween Dirt Cups are a fun and spooky dessert perfect for Halloween parties, featuring layers of chocolate pudding, crushed cookies, and gummy worms.
Ingredients
- 1 package chocolate pudding mix
- 2 cups milk
- 1 package Oreo cookies, crushed
- Gummy worms
- Plastic cups for serving
Instructions
- Prepare the chocolate pudding according to the package instructions using the milk.
- In a separate bowl, crush the Oreo cookies into fine crumbs.
- In plastic cups, layer the chocolate pudding and crushed Oreo cookies, starting with pudding at the bottom.
- Repeat the layers until the cups are filled, finishing with a layer of crushed cookies on top.
- Garnish with gummy worms on top of the dirt cups.
- Chill in the refrigerator for at least 30 minutes before serving.
Notes
- For a more festive look, you can add Halloween-themed sprinkles on top.
- These cups can be made a day in advance and stored in the refrigerator.
- Feel free to use different types of candy for decoration.
Nutrition
- Serving Size: 1 cup
- Calories: 250
- Sugar: 20g
- Sodium: 150mg
- Fat: 10g
- Saturated Fat: 5g
- Unsaturated Fat: 3g
- Trans Fat: 0g
- Carbohydrates: 35g
- Fiber: 2g
- Protein: 4g
- Cholesterol: 10mg