

Deliciously Cute Pumpkin Cake Pops Perfect for Fall Celebrations!
As the leaves turn and the air gets crisp, I can’t help but feel the excitement of fall celebrations. There’s something magical about this season, and what better way to embrace it than with these Deliciously Cute Pumpkin Cake Pops Perfect for Fall Celebrations? These little treats are not only adorable but also bursting with the warm flavors of pumpkin and spices. Whether you’re hosting a gathering or just want to bring a smile to your family’s faces, these cake pops are the perfect blend of fun and flavor. Trust me, they’ll be a hit!
Why You’ll Love This Deliciously Cute Pumpkin Cake Pops Perfect for Fall Celebrations!
These pumpkin cake pops are a breeze to make, even for busy moms like us! With just a few simple steps, you can whip up a batch that’s sure to impress. The delightful combination of pumpkin and spices creates a flavor explosion that’s perfect for fall. Plus, their cute appearance makes them a fun treat for kids and adults alike. You’ll love how quickly they disappear!
Ingredients for Deliciously Cute Pumpkin Cake Pops Perfect for Fall Celebrations!
Gathering the right ingredients is the first step to creating these delightful treats. Here’s what you’ll need:
- Yellow cake mix: This is the base of our cake pops, providing a light and fluffy texture.
- Pumpkin puree: Adds moisture and that signature pumpkin flavor, making these pops perfect for fall.
- Water: Helps to combine the dry ingredients and keep the batter smooth.
- Large eggs: Essential for binding the ingredients together and giving the cake structure.
- Cinnamon: A warm spice that enhances the pumpkin flavor and brings a cozy aroma.
- Nutmeg: Adds a hint of earthiness, complementing the sweetness of the cake.
- Vanilla extract: A splash of vanilla rounds out the flavors beautifully.
- Orange candy melts: These are what give our cake pops their vibrant pumpkin color and sweet coating.
- Green candy melts: Perfect for creating the cute little stems on our pumpkin pops.
- Lollipop sticks: Essential for turning our cake balls into fun, handheld treats.
- Sprinkles (optional): For a festive touch, add sprinkles to make your cake pops even cuter!
For exact measurements, check the bottom of the article where you can find everything listed for easy printing. Feel free to get creative with your ingredients! You can swap in different spices or even use a chocolate cake mix for a unique twist. The possibilities are endless!
How to Make Deliciously Cute Pumpkin Cake Pops Perfect for Fall Celebrations!
Step 1: Preheat the Oven
Preheating the oven is a crucial step in baking. It ensures that your cake bakes evenly and rises properly. If you skip this step, your cake might end up dense or uneven. So, set your oven to 350°F (175°C) and let it warm up while you prepare the batter. Your future cake pops will thank you!
Step 2: Mix the Ingredients
In a large mixing bowl, combine the yellow cake mix, pumpkin puree, water, eggs, cinnamon, nutmeg, and vanilla extract. I like to use a whisk to blend everything together until it’s smooth and creamy. The pumpkin puree adds moisture, while the spices fill your kitchen with that cozy fall aroma. Make sure there are no lumps; a well-mixed batter is key to fluffy cake pops. Once everything is combined, you’re ready to bake!
Step 3: Bake the Cake
Pour the batter into a greased cake pan and pop it into your preheated oven. Bake for 25-30 minutes. To check if it’s done, insert a toothpick into the center. If it comes out clean, your cake is ready! If not, give it a few more minutes. The smell wafting through your home will be irresistible!
Step 4: Crumble the Cake
Once the cake has cooled completely, it’s time to crumble it. Use your hands to break the cake into small pieces in a large bowl. The goal is to create a fine crumb that will hold together when mixed with frosting. Be gentle; you want to avoid any large chunks. This step is where the magic begins!
Step 5: Form the Cake Balls
Add a small amount of frosting to the crumbled cake. Start with just a couple of tablespoons and mix it in until the mixture holds together. You want it to be moist but not overly sticky. Once it’s combined, take small portions and roll them into balls, about the size of a golf ball. Place them on a baking sheet lined with parchment paper. This is where you can let your creativity shine—make them as round as you can!
Step 6: Chill the Cake Balls
🚫 Don’t Buy This If…
- ❌ You hate hosting fun parties
- ❌ You don’t like saving time in the kitchen
- ❌ You only want boring, basic recipes
✅ What You’ll Get:
- ✅ 63 spooky & delicious Halloween recipes
- ✅ Creepy treats, eerie snacks, scary drinks & more
- ✅ Kid-friendly & adult-approved
- ✅ 📥 Instant digital download – start cooking today!

Chilling the cake balls is essential for shaping and coating. Pop them in the refrigerator for at least 30 minutes. This helps them firm up, making it easier to dip them in candy melts later. Trust me, this step is worth the wait!
Step 7: Melt the Candy Coating
While the cake balls chill, it’s time to melt the orange candy melts. Follow the package instructions, usually done in the microwave in short bursts. Stir in between to ensure they melt evenly. The consistency should be smooth and pourable. If it’s too thick, add a tiny bit of vegetable oil to thin it out. This will give your cake pops a beautiful, glossy finish!
Step 8: Assemble the Cake Pops
Now comes the fun part! Dip the end of each lollipop stick into the melted orange candy. This helps the stick stay in place when inserted into the cake ball. Gently push the stick into the center of each cake ball, about halfway through. Then, dip each cake pop into the melted orange candy, allowing any excess to drip off. Place them back on the parchment paper to set. Your adorable pumpkin cake pops are starting to take shape!
Step 9: Decorate the Cake Pops
Once the orange coating has set, it’s time to add the finishing touches. Melt the green candy melts and drizzle them over the top of each cake pop to create cute little pumpkin stems. If you want to add some sparkle, sprinkle on some festive sprinkles while the coating is still wet. This is where you can really let your creativity shine, making each pop uniquely yours!
Tips for Success
- Make sure your cake is completely cool before crumbling; this prevents excess moisture.
- Use a cookie scoop for uniform cake balls; it makes the process quicker and easier.
- Don’t skip the chilling step; it helps the cake pops hold their shape.
- Experiment with different candy melt colors for a fun twist!
- Store any leftovers in the fridge to keep them fresh and tasty.
Equipment Needed for Deliciously Cute Pumpkin Cake Pops Perfect for Fall Celebrations!
- Mixing bowl: A large bowl for combining ingredients. A sturdy plastic or glass bowl works well.
- Whisk: For mixing the batter smoothly. A fork can also do the trick!
- Cake pan: A standard 9×13 inch pan is perfect for baking.
- Baking sheet: To chill and set your cake pops. Any flat surface will do.
- Parchment paper: For easy cleanup and to prevent sticking.
Variations of Deliciously Cute Pumpkin Cake Pops Perfect for Fall Celebrations!
- Spice it Up: Add a pinch of ginger or allspice for an extra kick of flavor.
- Chocolate Lovers: Use chocolate cake mix instead of yellow for a rich twist.
- Gluten-Free Option: Substitute the cake mix with a gluten-free blend for a safe treat.
- Vegan Version: Replace eggs with flaxseed meal and use a dairy-free frosting.
- Nutty Delight: Mix in some finely chopped nuts or chocolate chips for added texture.
Serving Suggestions for Deliciously Cute Pumpkin Cake Pops Perfect for Fall Celebrations!
- Pair with a warm cup of spiced apple cider for a cozy treat.
- Serve on a festive platter with autumn leaves for a charming display.
- Include a side of whipped cream for dipping—delicious!
- Perfect for Halloween parties or Thanksgiving gatherings.
FAQs about Deliciously Cute Pumpkin Cake Pops Perfect for Fall Celebrations!
Can I make these pumpkin cake pops ahead of time?
Absolutely! You can prepare the cake pops a day or two in advance. Just store them in the refrigerator to keep them fresh. They also freeze well, so feel free to make a batch and save some for later!
What can I use instead of candy melts?
If you can’t find candy melts, you can use chocolate chips or white chocolate. Just melt them down and add a bit of vegetable oil to achieve a smooth consistency. It’s a great alternative that still tastes delicious!
How do I store leftover cake pops?
Store your leftover cake pops in an airtight container in the refrigerator. They’ll stay fresh for up to a week. Just make sure they’re completely set before storing to avoid any sticking!
Can I customize the flavors of my cake pops?
Definitely! You can add different spices like ginger or even swap the pumpkin puree for applesauce for a different flavor profile. The beauty of these cake pops is that they’re versatile!
Are these pumpkin cake pops suitable for kids?
Yes! These cake pops are a hit with kids. They’re fun to eat and can be decorated in various ways. Just keep an eye on the sprinkles if you have little ones who might go overboard!
Summarizing the Joy of Deliciously Cute Pumpkin Cake Pops Perfect for Fall Celebrations!
Creating these Deliciously Cute Pumpkin Cake Pops Perfect for Fall Celebrations is more than just baking; it’s about making memories. The joy of watching your loved ones’ faces light up as they take a bite is priceless. These cake pops bring a festive spirit to any gathering, filling your home with warmth and laughter. Plus, they’re a fun way to involve the kids in the kitchen! So, whether you’re celebrating Halloween or Thanksgiving, these adorable treats will surely add a sprinkle of joy to your fall festivities. Happy baking!
Print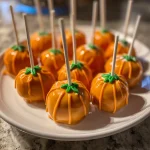
Deliciously Cute Pumpkin Cake Pops for Fall Fun!
- Prep Time: 30 minutes
- Cook Time: 30 minutes
- Total Time: 1 hour
- Yield: 24 cake pops 1x
- Category: Dessert
- Method: Baking and Decorating
- Cuisine: American
- Diet: Vegetarian
Description
These adorable pumpkin cake pops are perfect for fall celebrations, combining delicious flavors with a fun presentation.
Ingredients
- 1 box of yellow cake mix
- 1 cup of pumpkin puree
- 1/2 cup of water
- 3 large eggs
- 1 teaspoon of cinnamon
- 1/2 teaspoon of nutmeg
- 1/2 teaspoon of vanilla extract
- 1 package of orange candy melts
- 1 package of green candy melts
- 1 package of lollipop sticks
- Sprinkles (optional)
Instructions
- Preheat the oven to 350°F (175°C).
- In a large bowl, mix the cake mix, pumpkin puree, water, eggs, cinnamon, nutmeg, and vanilla extract until well combined.
- Pour the batter into a greased cake pan and bake for 25-30 minutes or until a toothpick comes out clean.
- Let the cake cool completely, then crumble it into a large bowl.
- Add a small amount of frosting to the crumbled cake and mix until it holds together.
- Form the mixture into small balls and place them on a baking sheet lined with parchment paper.
- Chill the cake balls in the refrigerator for at least 30 minutes.
- Melt the orange candy melts according to package instructions.
- Dip the end of each lollipop stick into the melted candy, then insert it into a cake ball.
- Dip each cake pop into the melted orange candy, allowing excess to drip off.
- Place the cake pops back on the parchment paper and let them set.
- Once set, melt the green candy melts and drizzle them over the cake pops to create pumpkin stems.
- Add sprinkles if desired for extra decoration.
Notes
- Store cake pops in the refrigerator for up to a week.
- Feel free to customize the flavors by adding different spices or extracts.
- These cake pops can be made ahead of time and frozen for later use.
Nutrition
- Serving Size: 1 cake pop
- Calories: 150
- Sugar: 10g
- Sodium: 50mg
- Fat: 6g
- Saturated Fat: 3g
- Unsaturated Fat: 2g
- Trans Fat: 0g
- Carbohydrates: 20g
- Fiber: 1g
- Protein: 2g
- Cholesterol: 30mg