
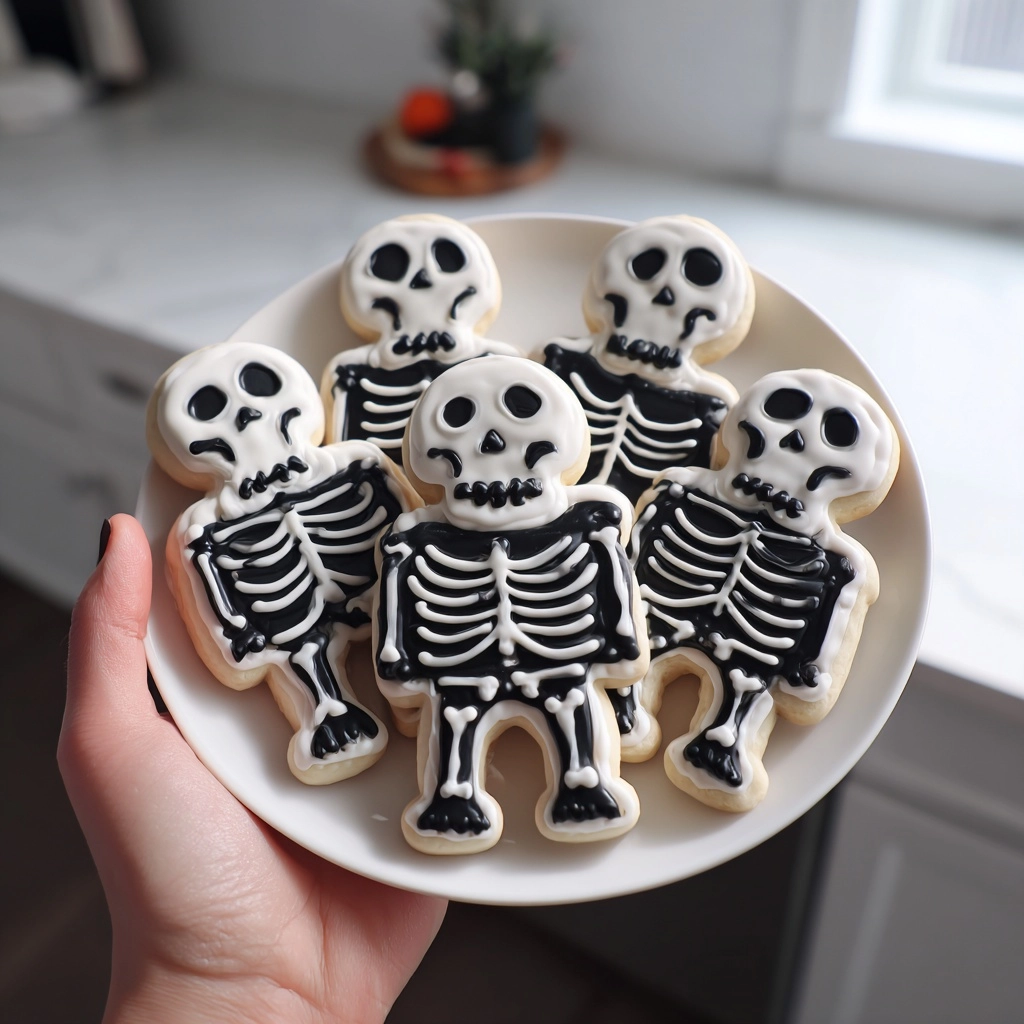
Skeleton Sugar Cookies
As the leaves turn and the air gets crisp, I find myself dreaming of Halloween treats. Skeleton sugar cookies are not just a festive delight; they’re a fun way to bring the family together in the kitchen. I know how busy life can get, especially for moms juggling work and home. This recipe is a quick solution for a busy day, allowing you to whip up something special without the stress. Plus, these cookies are sure to impress your loved ones, making them perfect for parties or cozy nights in. Let’s dive into this delicious adventure!
Why You’ll Love This Skeleton Sugar Cookies
These skeleton sugar cookies are a breeze to make, even on the busiest of days. With just a handful of ingredients, you can create a delightful treat that’s both tasty and visually appealing. The sweet aroma wafting through your kitchen will have everyone eagerly waiting for a bite. Plus, decorating them is a fun activity for the kids, turning baking into a cherished family memory. What’s not to love?
Ingredients for Skeleton Sugar Cookies
Gathering the right ingredients is the first step to creating these delightful skeleton sugar cookies. Here’s what you’ll need:
- All-purpose flour: This is the backbone of your cookies, providing structure and a soft texture.
- Baking soda: This helps the cookies rise, giving them that perfect fluffy bite.
- Baking powder: A little extra lift to ensure your cookies don’t turn out flat.
- Unsalted butter: Softened butter is key for that rich, creamy flavor and tender crumb.
- White sugar: Sweetness is essential, and this sugar helps create a lovely crisp edge.
- Egg: This binds everything together and adds moisture, making your cookies chewy.
- Vanilla extract: A splash of vanilla enhances the flavor, making each bite irresistible.
- Buttermilk: This is optional but can be added to adjust the dough’s consistency for easier handling.
- Royal icing: Perfect for decorating your cookies, giving them that spooky skeleton look.
- Black food coloring: This adds a fun, festive touch to your icing, making your cookies pop!
For exact measurements, check the bottom of the article where you can find everything listed for easy printing. Happy baking!
How to Make Skeleton Sugar Cookies
Now that we have our ingredients ready, let’s get baking! Follow these simple steps to create your delicious skeleton sugar cookies. Each step is designed to make the process easy and enjoyable, even for those busy days.
Step 1: Preheat Your Oven
First things first, preheat your oven to 375°F (190°C). Preheating is crucial because it ensures your cookies bake evenly. If you skip this step, your cookies might spread too much or not rise properly. Trust me, a well-preheated oven is the secret to cookie perfection!
Step 2: Mix Dry Ingredients
In a bowl, combine the all-purpose flour, baking soda, and baking powder. Whisk them together until they’re well blended. This step is important because it evenly distributes the leavening agents, ensuring your cookies rise beautifully. No one wants flat skeletons, right?
Step 3: Cream Butter and Sugar
In a separate bowl, cream together the softened butter and white sugar until the mixture is smooth and fluffy. This process is essential for creating a light texture in your cookies. The air you incorporate while creaming will help them rise and become tender. It’s like giving your cookies a little spa treatment!
Step 4: Add Egg and Vanilla
Next, beat in the egg and vanilla extract. The egg acts as a binder, holding everything together, while the vanilla adds a delightful flavor. It’s the magic touch that transforms your cookies from good to great. You’ll want to savor that aroma!
Step 5: Combine Dry and Wet Ingredients
🚫 Don’t Buy This If…
- ❌ You hate hosting fun parties
- ❌ You don’t like saving time in the kitchen
- ❌ You only want boring, basic recipes
✅ What You’ll Get:
- ✅ 63 spooky & delicious Halloween recipes
- ✅ Creepy treats, eerie snacks, scary drinks & more
- ✅ Kid-friendly & adult-approved
- ✅ 📥 Instant digital download – start cooking today!

Now, gradually blend the dry ingredients into the wet mixture. Do this slowly to avoid overmixing, which can make your cookies tough. Mix just until everything is combined. You want a soft dough that’s easy to work with, not a workout!
Step 6: Adjust Dough Consistency
If your dough feels too dry, add buttermilk one tablespoon at a time. This will help achieve the right consistency. The dough should be soft but not sticky. Think of it like a cozy blanket—comfortable but not too heavy!
Step 7: Roll Out the Dough
On a floured surface, roll out the dough to about 1/4 inch thick. Use a light touch to avoid sticking. If the dough is too sticky, sprinkle a little more flour. Rolling it out evenly ensures that all your cookies bake at the same rate. No uneven skeletons here!
Step 8: Cut Out Skeleton Shapes
Using your skeleton cookie cutters, cut out fun shapes from the rolled dough. Feel free to mix and match different designs for a spooky assortment. The kids will love this part! It’s like creating a Halloween cookie army!
Step 9: Bake the Cookies
Place the cookies on ungreased baking sheets and bake for 8 to 10 minutes. Keep an eye on them; they’re done when they turn golden around the edges. The smell wafting through your kitchen will be irresistible, and you’ll know they’re ready to come out!
Step 10: Cool and Decorate
Once baked, let the cookies cool on the baking sheets for a few minutes before transferring them to a wire rack. This cooling time is essential for the cookies to set properly. Once cool, it’s time to unleash your creativity with royal icing and black food coloring. Decorate them to your heart’s content, and watch your skeletons come to life!
Tips for Success
- Always use softened butter for easy mixing and a smooth dough.
- Chill the dough for 30 minutes if it feels too soft; this makes it easier to handle.
- Use a variety of skeleton cookie cutters for a fun assortment.
- Don’t skip the cooling step; it helps the cookies maintain their shape.
- Experiment with different colors of icing for a festive touch!
Equipment Needed
- Baking sheets: Use ungreased sheets or line with parchment paper for easy cleanup.
- Mixing bowls: A large bowl for mixing and a smaller one for creaming.
- Cookie cutters: Skeleton shapes are fun, but any festive shapes work!
- Rolling pin: A simple one will do; no need for fancy tools.
- Wire rack: Essential for cooling your cookies evenly.
Variations of Skeleton Sugar Cookies
- Chocolate Skeleton Sugar Cookies: Substitute half of the all-purpose flour with cocoa powder for a rich chocolate flavor.
- Gluten-Free Option: Use a gluten-free all-purpose flour blend to make these cookies suitable for gluten-sensitive friends.
- Spiced Skeleton Cookies: Add a teaspoon of cinnamon or nutmeg to the dry ingredients for a warm, autumnal twist.
- Vegan Skeleton Cookies: Replace the egg with a flax egg (1 tablespoon ground flaxseed mixed with 2.5 tablespoons water) and use vegan butter.
- Nutty Flavor: Incorporate finely chopped nuts or almond extract for an extra layer of flavor.
Serving Suggestions for Skeleton Sugar Cookies
- Pair these cookies with a warm cup of apple cider for a cozy fall treat.
- Serve alongside spooky-themed cupcakes for a festive dessert table.
- Display them on a decorative platter with Halloween-themed decorations for a fun presentation.
- Offer a side of colorful sprinkles for kids to add their own flair!
FAQs about Skeleton Sugar Cookies
As you embark on your skeleton sugar cookie adventure, you might have a few questions. Here are some common queries I’ve encountered, along with helpful answers to guide you through the process.
Can I make the dough ahead of time?
Absolutely! You can prepare the dough in advance and refrigerate it for up to three days. Just make sure to wrap it tightly in plastic wrap. When you’re ready to bake, let it sit at room temperature for about 10 minutes before rolling it out.
What can I use instead of royal icing for decoration?
If royal icing feels too daunting, you can use store-bought frosting or melted chocolate. Just remember, these alternatives may not harden like royal icing, so they’re best for immediate enjoyment!
How do I store my skeleton sugar cookies?
Store your cookies in an airtight container at room temperature. They’ll stay fresh for about a week. If you want to keep them longer, consider freezing them. Just make sure to layer them with parchment paper to prevent sticking.
Can I use different cookie cutters?
Of course! While skeleton shapes are fun, feel free to use any Halloween-themed cookie cutters you have. Ghosts, pumpkins, or bats can add variety to your cookie platter!
What’s the best way to decorate my cookies?
Get creative! Use piping bags for detailed designs or simply spread icing with a knife for a more rustic look. Add sprinkles, edible glitter, or even candy eyes for a fun twist. The sky’s the limit!
Summarizing the Joy of Skeleton Sugar Cookies
Creating skeleton sugar cookies is more than just baking; it’s about making memories. The laughter shared while decorating, the sweet aroma filling your home, and the joy of seeing your loved ones enjoy your creations are priceless. These cookies bring a festive spirit to your Halloween celebrations, making them a delightful treat for all ages. Whether you’re hosting a party or enjoying a cozy night in, these cookies are sure to add a sprinkle of magic to your festivities. So roll up your sleeves, gather your family, and let the fun begin with these charming skeleton sugar cookies!
Print
Skeleton Sugar Cookies That Wow Your Halloween Party!
- Prep Time: 30 minutes
- Cook Time: 10 minutes
- Total Time: 40 minutes
- Yield: 24 cookies 1x
- Category: Dessert
- Method: Baking
- Cuisine: American
- Diet: Vegetarian
Description
Delicious and festive skeleton sugar cookies perfect for Halloween celebrations.
Ingredients
- 2 3/4 cups all-purpose flour
- 1 teaspoon baking soda
- 1/2 teaspoon baking powder
- 1 cup unsalted butter, softened
- 1 1/2 cups white sugar
- 1 egg
- 1 teaspoon vanilla extract
- 3 to 4 tablespoons buttermilk
- Royal icing for decoration
- Black food coloring
Instructions
- Preheat your oven to 375°F (190°C).
- In a bowl, mix together flour, baking soda, and baking powder.
- In a separate bowl, cream together the butter and sugar until smooth.
- Beat in the egg and vanilla extract.
- Gradually blend in the dry ingredients.
- If the dough is too dry, add buttermilk one tablespoon at a time.
- Roll out the dough on a floured surface to about 1/4 inch thick.
- Cut out skeleton shapes using cookie cutters.
- Place cookies on ungreased baking sheets.
- Bake for 8 to 10 minutes, or until golden.
- Let cool before decorating with royal icing and black food coloring.
Notes
- Ensure the butter is softened for easier mixing.
- Chill the dough for 30 minutes for easier handling.
- Use a variety of skeleton cookie cutters for fun shapes.
Nutrition
- Serving Size: 1 cookie
- Calories: 150
- Sugar: 10g
- Sodium: 50mg
- Fat: 7g
- Saturated Fat: 4g
- Unsaturated Fat: 2g
- Trans Fat: 0g
- Carbohydrates: 20g
- Fiber: 0g
- Protein: 1g
- Cholesterol: 20mg