
Vampire Fudge Recipe
As the leaves turn and the air gets crisp, I find myself craving something sweet and a little spooky. That’s where my Vampire Fudge Recipe comes in! This delightful treat is not only a quick solution for busy days, but it also adds a fun twist to your Halloween celebrations. With just a few simple ingredients, you can whip up a batch that will impress your loved ones and satisfy your sweet tooth. Trust me, this fudge is a crowd-pleaser that will have everyone coming back for more!
Why You’ll Love This Vampire Fudge Recipe
This Vampire Fudge Recipe is a lifesaver for busy moms and professionals alike. It’s incredibly easy to make, taking just 15 minutes of prep time. The rich, chocolatey flavor combined with the spooky colors makes it a hit at any Halloween gathering. Plus, it’s a fun activity to do with your kids, creating sweet memories while whipping up a delicious treat. Who wouldn’t love that?
Ingredients for Vampire Fudge Recipe
Gathering the right ingredients is the first step to creating this spooktacular treat! Here’s what you’ll need:
- Chocolate chips: The star of the show! I prefer semi-sweet for a balanced sweetness, but feel free to use dark chocolate for a richer flavor.
- Sweetened condensed milk: This creamy ingredient adds sweetness and helps bind everything together. It’s like magic in a can!
- Butter: A little butter adds richness and helps achieve that smooth texture we all love in fudge.
- Vanilla extract: Just a teaspoon elevates the flavor, giving your fudge a warm, inviting aroma.
- Chopped nuts (optional): If you enjoy a bit of crunch, toss in some nuts! Walnuts or pecans work beautifully.
- Red and black food coloring: These colors are essential for that spooky vampire look. They’ll transform your fudge into a Halloween masterpiece!
- Edible eyes for decoration: These little guys are the finishing touch! They add a fun and festive flair to your fudge.
For exact measurements, check the bottom of the article where you can find everything listed for easy printing. Now, let’s get ready to create some deliciously spooky fudge!
How to Make Vampire Fudge Recipe
Step 1: Combine Ingredients
To kick off this Vampire Fudge Recipe, grab a medium saucepan and place it over medium heat. Add in your chocolate chips, sweetened condensed milk, and butter. As the heat begins to work its magic, the chocolate will start to melt. Stir gently but consistently to ensure everything blends together smoothly. This is where the magic begins! The aroma of melting chocolate will fill your kitchen, making it hard to resist sneaking a taste. Just remember, patience is key!
Step 2: Stir Until Smooth
Now, let’s talk about stirring. This step is crucial! Keep stirring continuously until the mixture transforms into a silky, smooth delight. If you stop stirring, you risk burning the chocolate or creating lumps. Trust me, nobody wants that! As the chocolate melts, it will blend beautifully with the sweetened condensed milk and butter. The goal is a luscious, velvety texture that will make your fudge irresistible. So, keep that spoon moving!
Step 3: Add Flavor
Once your mixture is smooth and melted, it’s time to add some flavor! Remove the saucepan from the heat and stir in the vanilla extract. This little addition will elevate your fudge to a whole new level. If you’re feeling adventurous, toss in some chopped nuts for a delightful crunch. They add texture and a nutty flavor that pairs perfectly with the chocolate. Mix well, and get ready for the next colorful step!
Step 4: Color the Fudge
Now comes the fun part—coloring your fudge! Divide the melted mixture into two separate bowls. In one bowl, add a few drops of red food coloring, and in the other, add black food coloring. Mix each bowl until you achieve your desired shades. The vibrant colors will create that spooky vampire look we’re going for! Don’t be shy with the food coloring; the more vibrant, the better! This is your chance to get creative!
Step 5: Layer the Fudge
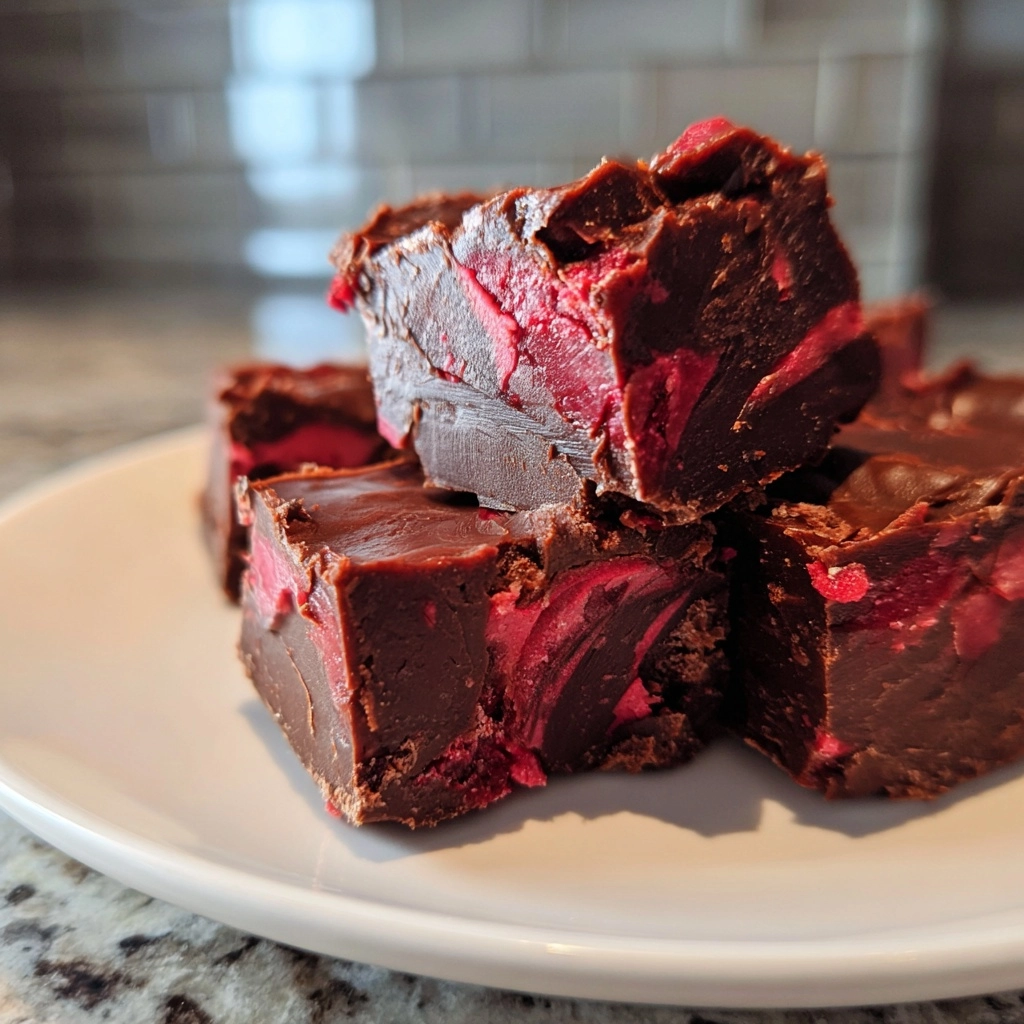
With your colored fudge ready, it’s time to layer! Start by pouring the black fudge mixture into a greased 8×8 inch pan. Spread it evenly across the bottom. Next, take spoonfuls of the red fudge and drop them on top of the black layer. Don’t worry about being perfect; the swirls will come next! This layering creates a striking contrast that will wow your guests. It’s like a Halloween masterpiece in the making!
Step 6: Swirl and Set
🚫 Don’t Buy This If…
- ❌ You hate hosting fun parties
- ❌ You don’t like saving time in the kitchen
- ❌ You only want boring, basic recipes
✅ What You’ll Get:
- ✅ 63 spooky & delicious Halloween recipes
- ✅ Creepy treats, eerie snacks, scary drinks & more
- ✅ Kid-friendly & adult-approved
- ✅ 📥 Instant digital download – start cooking today!

Now, grab a knife and gently swirl the red and black mixtures together. This is where the magic happens! You want to create a marbled effect, so don’t overdo it—just a few swirls will do. Once you’re satisfied with the design, pop the pan into the refrigerator. Let it chill for at least two hours until it’s set. The anticipation will build as you wait for your spooky fudge to solidify!
Step 7: Cut and Decorate
Once your fudge is set, it’s time for the final touches! Carefully remove it from the pan and place it on a cutting board. Cut it into squares, and don’t worry about making them perfect; a little rustic charm adds to the fun! Now, for the grand finale—decorate each piece with edible eyes. These little guys will bring your Vampire Fudge to life! Your spooky treat is now ready to impress at any Halloween gathering!
Tips for Success
- Use high-quality chocolate chips for a creamier texture.
- Make sure to stir continuously to avoid burning the chocolate.
- Don’t be afraid to adjust the food coloring for a more vibrant look.
- Let the fudge set completely in the fridge for the best texture.
- Experiment with different nuts or toppings for a unique twist!
Equipment Needed
- Medium saucepan: A regular pot works too, just ensure it has a heavy bottom to prevent burning.
- Wooden spoon or spatula: Any sturdy spoon will do for stirring, but a spatula helps scrape the sides.
- 8×8 inch pan: If you don’t have one, a similar-sized dish will work just fine!
- Knife: A sharp knife is essential for cutting the fudge into squares.
Variations of Vampire Fudge Recipe
- Nut-Free Version: Omit the nuts for a smooth texture, perfect for those with nut allergies.
- Vegan Option: Use dairy-free chocolate chips and coconut cream instead of sweetened condensed milk for a vegan-friendly treat.
- Spicy Twist: Add a pinch of cayenne pepper or chili powder to the chocolate mixture for a surprising kick!
- Fruit Flavored: Incorporate a few drops of raspberry or cherry extract for a fruity flavor that pairs well with chocolate.
- Marshmallow Swirl: Fold in mini marshmallows before refrigerating for a gooey, delightful surprise in every bite.
Serving Suggestions for Vampire Fudge Recipe
- Pair with a warm cup of hot chocolate for a cozy treat.
- Serve alongside spooky-themed cookies for a festive dessert platter.
- Present on a Halloween-themed serving tray for added flair.
- Wrap individual pieces in colorful cellophane for party favors.
- Enjoy with a scoop of vanilla ice cream for a delicious contrast!
FAQs about Vampire Fudge Recipe
Can I make Vampire Fudge ahead of time?
Absolutely! This fudge can be made a few days in advance. Just store it in an airtight container in the refrigerator. It will stay fresh and delicious, ready to impress your guests!
What can I use instead of sweetened condensed milk?
If you’re looking for a substitute, you can use homemade condensed milk made from milk and sugar. Alternatively, coconut cream can work for a dairy-free option, giving a unique flavor twist!
How do I store leftover Vampire Fudge?
Store any leftover fudge in an airtight container in the refrigerator. It should last for about a week, but I doubt it will last that long with how delicious it is!
Can I freeze Vampire Fudge?
Yes, you can freeze it! Just wrap the fudge tightly in plastic wrap and then place it in a freezer-safe container. It can last up to three months in the freezer. Just thaw it in the fridge before serving.
What other decorations can I use for my Vampire Fudge?
Get creative! You can use sprinkles, chocolate shavings, or even gummy worms for a fun twist. The possibilities are endless, so let your imagination run wild!
Summarizing the Joy of Making Vampire Fudge Recipe
Making this Vampire Fudge Recipe is more than just whipping up a treat; it’s about creating memories. The laughter shared in the kitchen, the vibrant colors swirling together, and the delightful aroma of chocolate melting are all part of the experience. Each bite of this spooky fudge brings joy, not just to you but to everyone who gets to enjoy it. Whether you’re hosting a Halloween party or simply indulging with your family, this recipe is a sweet reminder that the best moments are often made in the kitchen. So, gather your loved ones and let the fun begin!
Print
Vampire Fudge Recipe: A Spooktacular Halloween Treat!
- Prep Time: 15 minutes
- Cook Time: 10 minutes
- Total Time: 2 hours 25 minutes
- Yield: 16 servings 1x
- Category: Dessert
- Method: Stovetop
- Cuisine: American
- Diet: Vegetarian
Description
A deliciously spooky fudge recipe perfect for Halloween celebrations.
Ingredients
- 2 cups chocolate chips
- 1 can sweetened condensed milk
- 1/2 cup butter
- 1 teaspoon vanilla extract
- 1/2 cup chopped nuts (optional)
- Red and black food coloring
- Edible eyes for decoration
Instructions
- In a saucepan, combine chocolate chips, sweetened condensed milk, and butter over medium heat.
- Stir continuously until the mixture is smooth and melted.
- Remove from heat and stir in vanilla extract and nuts if using.
- Divide the mixture into two bowls. Add red food coloring to one bowl and black food coloring to the other, mixing until desired colors are achieved.
- In a greased 8×8 inch pan, pour in the black fudge mixture and spread evenly.
- Drop spoonfuls of the red fudge mixture on top of the black fudge and swirl with a knife to create a marbled effect.
- Refrigerate for at least 2 hours until set.
- Once set, cut into squares and decorate with edible eyes.
Notes
- For a creamier texture, use high-quality chocolate chips.
- Store in an airtight container in the refrigerator.
- Feel free to customize the decorations for a more festive look.
Nutrition
- Serving Size: 1 square
- Calories: 150
- Sugar: 15g
- Sodium: 50mg
- Fat: 8g
- Saturated Fat: 5g
- Unsaturated Fat: 3g
- Trans Fat: 0g
- Carbohydrates: 18g
- Fiber: 1g
- Protein: 2g
- Cholesterol: 10mg